Keep in touch....
Order Now
Why Choose us?
![]() Experienced Mastering Engineers
Experienced Mastering Engineers
![]() Excellent Acoustics & Equipment
Excellent Acoustics & Equipment
![]() Fast Turnaround!
Fast Turnaround!
![]() Very Competitive Rates
Very Competitive Rates
![]() Direct Engineer Communication
Direct Engineer Communication
![]() FREE Mastering Sample
FREE Mastering Sample
![]() FREE Mix Down advice
FREE Mix Down advice
![]() Easy online system
Easy online system
![]() Industry proven results to large audiences worldwide
Industry proven results to large audiences worldwide
![]() Connected to other major audio mastering studios
Connected to other major audio mastering studios
![]() Experienced in all music genres: Dance music, electronic music, pop, electro, rock, jazz alternative and classical
Experienced in all music genres: Dance music, electronic music, pop, electro, rock, jazz alternative and classical
![]() Discounts offered to all returning clients and record labels
Discounts offered to all returning clients and record labels
![]() Satisfaction Guarantee!
Satisfaction Guarantee!
Make Contact

Mastering Course

Tips & Knowledgebase
Our tips & knowledge base section is a way for you to know, with some confidence, that what you are submitting for mastering is of the highest quality possible, and is free from any problems. This will in effect result in a greater sounding Master so it is well worth it!
![]() Premastering (what you must know before exporting or bouncing for Mastering)
Premastering (what you must know before exporting or bouncing for Mastering)
![]() General Mixing Tips (a great mix down will allow for a magnificent master!)
General Mixing Tips (a great mix down will allow for a magnificent master!)
![]() Common Waveform Problems (know what your waveform should look like before submission)
Common Waveform Problems (know what your waveform should look like before submission)
![]() Want to learn how to Master Audio yourself? (We have released our own tutorial course with over 6 hours of audio mastering know-how to get you mastering like the pro's!!!)
Want to learn how to Master Audio yourself? (We have released our own tutorial course with over 6 hours of audio mastering know-how to get you mastering like the pro's!!!)
![]() GETTING THINGS RIGHT BEFORE MASTERING (PREMASTERING):
GETTING THINGS RIGHT BEFORE MASTERING (PREMASTERING):
As Mastering is the final process applied to your audio to ensure that it sounds the best that it possibly can, it really is important to ensure that you follow a few basic steps to get your premaster just right before you send it to us.
There is nothing worse than getting a track that has already been compressed and limited on the master because this means that there is very little headroom for the Mastering Engineer to bring out the tracks magic with the highly specialised hardware and processing.
We strongly advise that you watch our video on Premastering in order to get the best out of your master. The Premastering and Mix down stage is paramount and steps need to be followed to ensure a good quality master. This video is featured in Music Tech Focus: Mastering Volume 4 (issue 0027) and is also included as part of our Mastering course: Mastering Now - The Complete Guide. It is also a good idea to read our general mixing tips to make sure that you are keeping good practice.
Here is a summary of the 9 ESSENTIAL TIPS:
1. Make sure that there are no effects on your Master Bus when you Bounce or Export!!!
Sub Point: If there is something on your Master Bus that you think you cannot live without, send your Mastering Engineer 2 versions: A No FX Mix and an FX Mix and let your Mastering Engineer know what the effect is.
2. Make sure that the level of your Track Peaks somewhere between -6 and -3dB!
3. If the Peak Level of your Track is higher than -3dB, it is best to reduce each tracks level rather than to just drop the master fader.
4. Eliminate any unwanted noise within your Mix.
5. Try to keep your Mix Clean and Dynamic. (see our general mixing tips)
6. Leave some silence at the beginning and at the end of your Track (2 - 8 Bars).
7. Bounce your track in the Format that you worked in (24 Bit, 44.1 kHz is the most common and is absolutely adequate). Please refer to our FAQ section for a list of all accepted file formats.
8. Be sure not to Normalise or to apply any Dither when you Bounce or Export!
9. Think about realistic and relevant reference tracks that you might be able to suggest to your Mastering Engineer. This makes it easier for us to understand what kind of sound that you are aiming for. However, please make sure that the reference is in fact similar in style and production to your own material.
---
If you follow these steps, your Final Audio Master will be the best it can be so it is worth it...
Remember first and foremost, once the mix is sent off you really can’t change anything drastically in the mastering stage and if something is out, mastering is most likely to be counter-productive!
![]() GENERAL MIXING TIPS TO AID WITH MIX DOWNS:
GENERAL MIXING TIPS TO AID WITH MIX DOWNS:
1. EQ / Equalization
It is seldom a good idea to use EQ on the Master output. If any, it should be both of high quality and subtle. You should treat the EQ of each instrument of your track so that it works with other instruments. For example if you have 2 bass elements, filter one at one frequency, and boost the other in the same place. This will create a space for it in the mix!
Applying a HPF high pass filter to all elements in your track that are not fundamentally important for the bass will really help clear a muddy mix and produce an overall clearer sound. Things like vocals, snare, cymbals, wind instruments, guitar, xylophone, synthesisers, etc… If you have a strong vocal in your track, then dip the EQ of other instruments around where the vocal is the strongest. Good EQ technique is as much a science as it is an art.
Since Mastering Equalisation is of high quality, it is usually better to leave it to your mastering Engineer to add brightness to your mix so don't add too much sizzle to the highs in the mix down stage. If you focus on a good balance, your Mastering Engineer can focus on making it shine!
2. Compression
Do not go overboard with heavy compression. Use ratios that are respectful of the style of music. 3:1 is a good all round starting point. Remember, it is impossible for your Mastering Engineer to recover lost dynamics. Of course, if you are producing a strong techno track, then heavier compression will be appropriate. Side chaining the compression of main synths and bass lines with the kick drum is also very worthy in practice. Again, try to find a compressor that adds the right colour and characteristics for your style of music.
3. Panning
Panning is often somewhat overlooked when mixing. It is extremely important to getting a nice balanced sound. Keep all bass elements central in the mix and try to find nice sweet spots to the left and to the right for the other elements. Use headphones to check if you do not trust your monitors.
You should hear a nice balance across the spectrum with equal weight / presence on each side.
Try to keep instruments from masking one another by panning them differently. As a general rule, try not to pan an instrument hard left or hard right as you will risk not hearing it if the track is played in mono. Generally around 30 or 40 degrees on either side of the center is about the maximum recommended spatial position for a particular track or instrument.
As vocals are perhaps the most important part of a mix, ensure that they are at least double tracked and panned for a bit of width.
![]() COMMON WAVEFORM PROBLEMS TO BE AWARE OF:
COMMON WAVEFORM PROBLEMS TO BE AWARE OF:
Here we have included 7 different Waveform examples that are all real life examples of what we sometimes receive at Zeitgeist Mastering. Only 3 of the 7 examples can in fact be worked with so be sure that you know how to spot the differences…
Let's start with the good and progress to the worst case scenario…
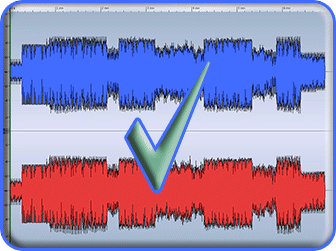
-3dB Peak Level - No Problems
In this example, there is an appropriate and workable amount of headroom left and there are no signs of heavy limiting on the output (transients in the waveform still stand out). 3 decibels headroom is great - we can indeed work with this!
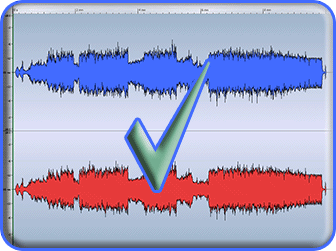
-6dB Peak Level - No Problems
In this example, there is quite a considerable amount of headroom left for mastering specific processing so we can absolutely work with this also! -10 or -15 dB peaks would be perhaps a bit too low, but -6 dB peaks are still nicely within the guidelines for a great final master.
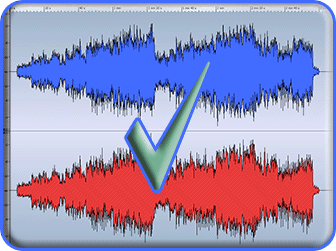
Peaking near 0dB - Not ideal but still OK
In this example the audio already peaks at 0dB... So immediately we can say that this is not ideal. It is however not a disaster and we can work with it because the general or average level stays low enough and there are no signs of square waving, heavy limiting or clipping.... This is evident because there are no distorted or flat spots in the wave. Some transients are hitting at 0 dB but only on occasion, and there is still considerable dynamic range to work with... So this is sort of an exception to the -6 to -3dB rule.
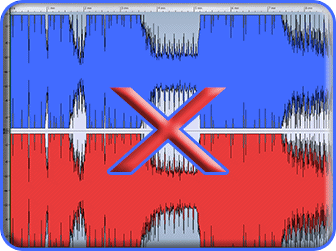
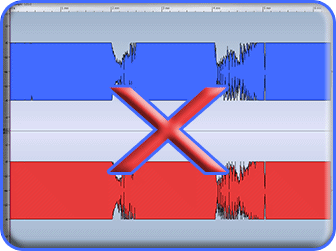
Limiter Applied on Master Bus - 0 dB Ceiling hit - Not OK!
This is a classic example of what we often get sent. A limiter has been left on the master bus at the time of export or bounce and consequently the track has no headroom for mastering processing. All that we can do with a file like this is make some EQ adjustments, add some shine and perhaps limit it a touch more with higher quality processing. This is however not going to give you the best results!
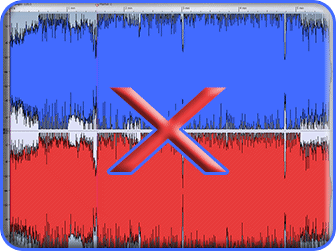
+3 to +6dB Clipping or over the 0dB peak ceiling level - A disaster for us!
This WAV is approximately +3dB over the 0dB ceiling level. This causes distortion and is a disaster for us. All of the flat spots or square waving that you see are produce nasty digital distortion. Digital audio is not forgiving like analogue and we simply cannot work with a file like this.

Total distortion with +6dB or more over the 0dB peak ceiling level - A disaster for us!
Like the previous example, this WAV is approximately +6dB or more over the 0dB ceiling level. Even worse than the last example! This is a train wreck and is unsalvageable. This is what may happen if you take the limiting and / or compression off the master bus and do not adjust the track levels afterwards.
Distorted or clipped file with a gain reduction applied after bounce - A disaster for us!
This last example is an interesting one and could look OK on first glance because there appears to be some headroom, but we can assure that it isn't! In this case a file with digital clipping or distortion has been bounced / exported and then, at the last minute, this distorted file has been reduced in level and sent to us for mastering. Well, unfortunately, it does not work like this. Once a file is damaged or distorted, this damage is engrained in the file and simply gaining it down afterwards will not repair it. All you will in effect do is a make a distorted file quieter!
![]() Mastering Tuition - Want to learn more about Mastering and learn how to go about it yourself?
Mastering Tuition - Want to learn more about Mastering and learn how to go about it yourself?
 We teamed up with Producer Tech and Music-Courses to provide an in depth guide to Mastering.
It provides over 6 hours of audio mastering specific tuition and know how.
This course is featured in the Music Tech Focus Magazine Issue 0027 - Mastering Volume 4, where some of the many 17 chapters are viewable on the included DVD.
Watch a video preview of the course here:
So, if you are interested in taking control of mastering yourself and possibly making big savings in the future, head on over to music-courses.com and get started!
![]()